| | |
| Selection Controls |
 |
|
|
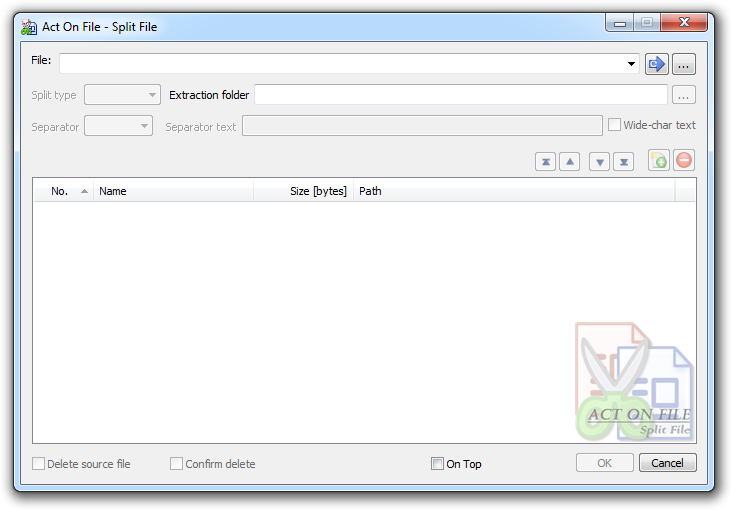
Enter the file to split. Click the scan button to examine the file properties and appropriately adjust the functionality controls.
|
 | Scan the selected file |
| Click this button to examine the file and adjust the functionality controls appropriately. |
 | Browse for file |
| Click this button to browse and select a file to split or extract sections from. |
| Operation Controls |
 |
|
|
This control determines how to partition the file.
|
| Split Type | Choose the file partitioning method. |
| Singleton | Enter each the size of each piece individually together with its filename. |
| Template | Enter the size of the pieces and a common (template) filename. The file will be partitioned into pieces with the selected size (the last piece may have a smaller file size). |
| Separator | Enter separator data to be used to partition the file and a common (template) filename. |
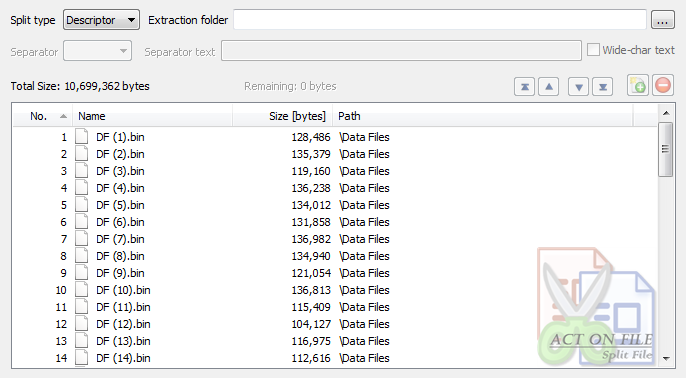
| Descriptor | This mode is selected by the module upon verification of the embedded descriptor of the source file. You can split a joined file with an embedded descriptor using the other split modes, but only joined files with embedded descriptors can be split using the Descriptor mode. |
| Split Type - Singleton |
 |
|
|
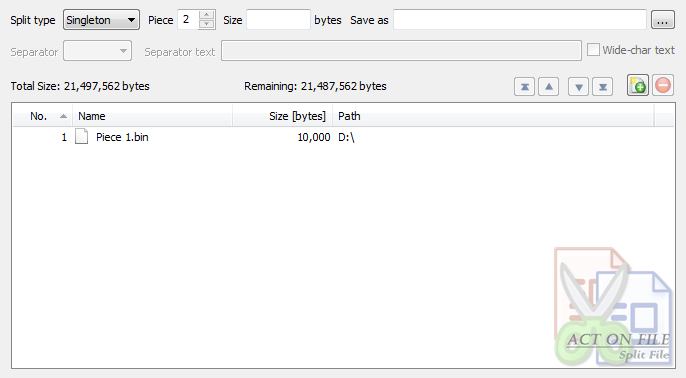
In the Singleton split mode, the user enters the size of each piece and its filename individually. After defining the properties of a new piece,
it must be declared by adding the piece to the File Sections view. Pieces can be moved, removed and replaced by using the appropriate controls.
To extract data from within a file you must create a piece which represents it and then drag and drop (or copy and paste) that piece into a folder
in Windows Explorer. For example, to extract the data from byte 100 to 500, first create a piece with a size of 99 bytes, then create a second piece
with a size of 400 bytes, finally drag and drop the second piece into a folder where the extracted data will be stored as a new file.
|
| Piece | Enter the index of the new piece. This index defines the position of the newly defined piece. |
| Size (in bytes) | Enter the size of the newly-defined piece in bytes. |
| Save as | Enter the filename (including the full path) of the newly-defined piece. |
 | Declare piece |
| Click this button to declare a new piece defined by the properties entered in the related controls. The piece will appear in the File Sections view. |
 | Remove piece |
| Click this button to remove the selected pieces. |
 | Move to Top |
| Moves the selected pieces to the top of the list. |
 | Move Up |
| Moves the selected pieces one position up in the list. |
 | Move Down |
| Moves the selected pieces one position down in the list. |
 | Move To Bottom |
| Moves the selected pieces to the bottom of the list. |
| Split Type - Template |
 |
|
|
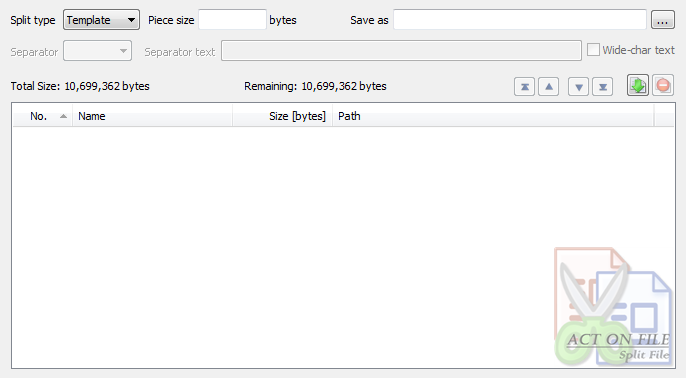
In the Template split mode, the user creates a template constituted by size and filename. The template must be applied to partition the file to pieces each
with the required size, except possibly the last piece which may be smaller than the others. The pieces are named using the entered template filename and an
inserted index. The pieces defined in this way cannot be moved or edited. To extract data from within a file, first partition the file and then drag and drop
(or copy and paste) the piece(s) required for extraction into a folder in Windows Explorer.
|
| Piece size (in bytes) | Enter the required size for the pieces in bytes. |
| Save as | Enter the template filename (including the full path) for the pieces. The actual filenames will have an added index. |
 | Apply template |
| Click this button to apply the template and partition the file. The pieces will appear in the File Sections view. |
 | Remove partition |
| Click this button to remove the declared partition. |
| Split Type - Separator |
 |
|
|
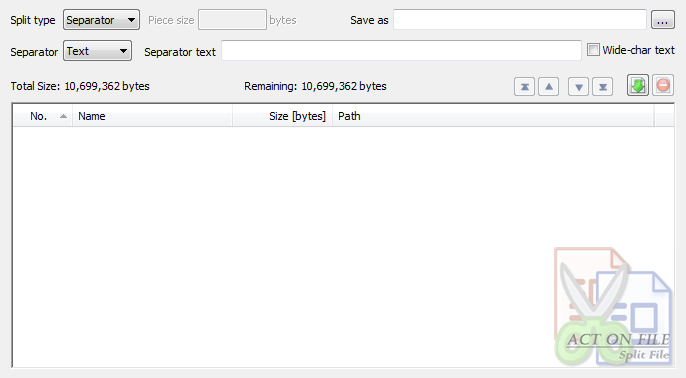
In the Separator split mode, the user creates a split condition constituted by separator data and a template filename. The split condition must be applied to partition the file to pieces.
Each occurrence of the separator data defines a new piece, whereas the separator is excluded from it. The next piece starts from the end of the separator data, thus the separator data is
excluded from all pieces. The names of the pieces are produced using the template filename and an inserted index. The pieces defined in this way cannot be moved or edited. To extract data
from within a file, first partition the file and then drag and drop (or copy and paste) the required for extraction piece(s) into a folder in Windows Explorer.
|
| Save as | Enter the filename (including the full path) for the template filename. |
| Separator | Select the separator type. |
| Text | Display controls for entering text as separator data. |
| Binary | Display controls for entering binary data (as hexadecimal numbers) as separator data. |
| File | Display controls for appointing a file as separator data. |
| Separator text | Enter the text to be searched for as an indicator of the border between the pieces of the partition. Each occurrence of this text indicates the end of the previous piece and the start of the next piece, the text itself is not included in either of the pieces. |
| Wide-char text | Set this checkbox to consider the separator text as wide (two bytes) character text. Clear this checkbox to consider the separator text as single byte characters. |
| Separator data | Enter the data to be searched for as indicator of the border between the pieces of the partition. Each occurrence of this data indicates the end of the previous piece and the start of the next piece, the data itself is not included in either of the pieces. |
| Separator file | Enter the file whose content will be used as a data indicator of the border between the pieces of the partition. Each occurrence of this data indicates the end of the previous piece and the start of the next piece, the data itself is not included in either of the pieces. |
 | Apply separator |
| Click this button to apply the separator and partition the file. The pieces will appear in the File Sections view. |
 | Remove partition |
| Click this button to remove the declared partition. |
| Split Type - Descriptor |
 |
|
|
The Descriptor split mode is automatic and is only applicable if the module finds an embedded descriptor in the source file and verifies its integrity.
To extract data from within a file in this mode, drag and drop (or copy and paste) the required for extraction files into a folder in Windows Explorer.
|
| File Sections View |
 |
|
|
This view controls displays the file sections (pieces) as currently defined.
|
| Further Actions Controls |
 |
|
|
These controls are used to help to automate some common activities after the process is successfully completed.
|
| Delete source file | Set this checkbox to request the module to send the source file to the Recycle Bin after a successful split process. |
| Confirm delete [Source file] | Set this checkbox to confirm the request to delete the source file after a successful split process. |
| Window Controls |
 |
|
|
These controls have generic meanings.
|
| On Top | Sets and clears the Always On Top flag on the window. This checkbox adds or removes the window from the group of Top-most windows. |
| OK | Start the process to split the source file using the partition displayed in the File Sections view. |
| Cancel | Closes the window without doing any work. The last selected properties are stored. |
